The best thing about Labeley, apart from the fact that it’s free, easy-to-use and registration is on a voluntary basis only, is that it can transform an ordinary person into a talented artist. It is almost as if Labeley gives you superpowers. And this superpower of having attractive design skills not only makes you feel good, but it can also make you look good around your friends, bring you points at work and help you get started with your own business idea.
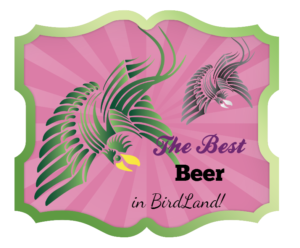
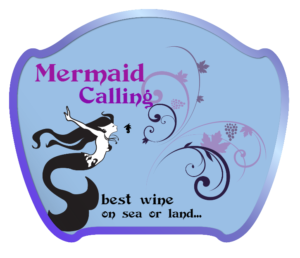
This might sound too good to be true, but it’s not entirely. For example, the author of this particular blog post is no expert at design. Photoshop? Sounds familiar. But when she uses Labeley, that’s when the magic happens — with only a few clicks of the mouse and no more than two minutes of her time, she can make this:
Imagine what she’d do in four minutes!
If you like what you see, get ready for a truly easy tutorial that will help you get started with Labeley and design personalized labels without much effort.
Six Fun Design Options for Creating Personalized Labels
If you go to labeley.com and click on the Start Designing button, a window that looks like this will pop up:
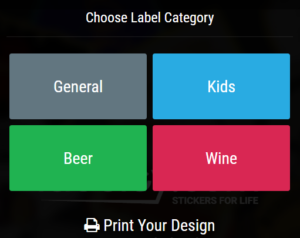
Obviously, you can choose from these four categories: General, Kids, Beer and Wine. There is also an option to Print Your Design, but we’ll talk about that in some future post.
Pick any category you want. If you choose Beer or Wine, you’ll find a lot of classy illustrations for beer and wine bottles, but you don’t have to limit yourself to only these two beverages. You can create labels for any other type of drink. Once you get familiar with design elements in all four categories, you’ll be able to decide with confidence which category is the best for your purposes.
Let’s say you chose Wine. We’ll go with that option in this tutorial.
As soon as you click on the Wine category, the main six design features will appear on the right: Shape, Border, Background, Graphic, Text and Upload. You don’t need to follow that order when you design your labels, but you do need to start with selecting a shape. You cannot create a label without that initial move.
So, click on the Shape icon and explore the templates provided by Labeley.
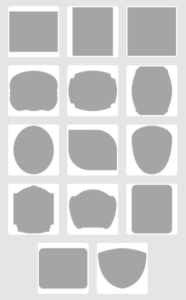
Note that there are more shapes to choose from in other categories.
Now pick your desired shape and make the next move. For the purposes of this tutorial, we’ll follow the order in the interface and click on Border.
As you can see, there are numerous differently-colored borders, so choose one you like the most. If later you realize that the chosen color does not match with the rest of your design, you can go back to the borders gallery and choose another one or simply get rid of the border completely.
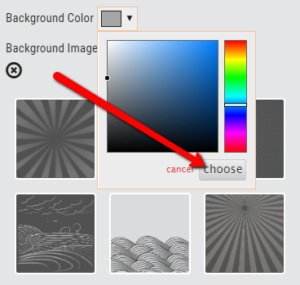
Backgrounds are next on the list. Select one.
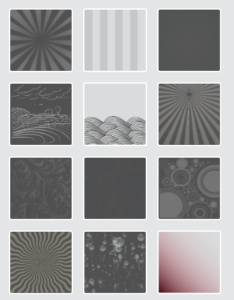
We are adding new backgrounds on a regular basis, so make sure to check the gallery every once in a while to find out what’s new.
When you’ve chosen the background, you can click on the Background Color tab and make a selection from the presented color palette. Note that you need to click on any space in the colored field to select a color. Your label background will immediately change to that hue and if you don’t like it, you can click on some other color. When you’re happy with your choice, don’t forget to click on choose.
Off to the funnest part of the design process: graphics. Click on the Graphic tab and explore our gallery of illustrations.
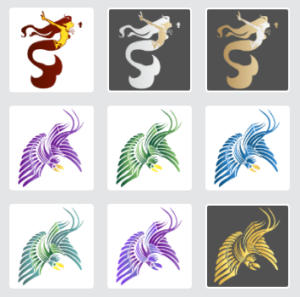
You can insert more than one graphic into the label. Then you can play with options on the top menu: delete an image, bring it forward, push it behind the other graphic, center or straighten the object.
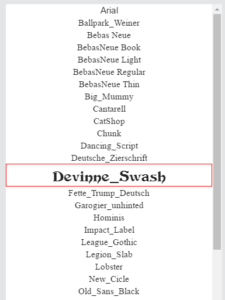
Next, click on Text and then on the Create Text button that will appear. All fonts that will appear will look the same, so you need to click on any that attracts your attention to see what it will look like when chosen and inserted into the label.
Now go ahead and add any text you wish to appear on your custom label. It can be the title of your wine brand, information about the percentage of alcohol, someone’s name (who wants to label their wine glass or bottle), or a fun message for the person you’re giving the wine to as a present.
Play with font and text options. See those little arrows on top and on the side of your text? Use them to resize and reposition your words.
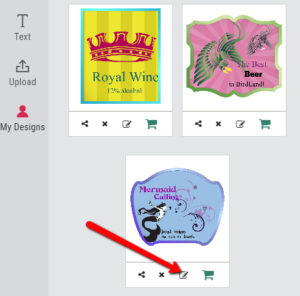
Finally, when you’re ready to move on to new design projects, you can save your design. You’ll find the option to save it in the upper right corner, but note that you can only save your label to Labeley if you create an account. In that case you’ll be able to save up to 10 designs at a time in the My Designs category.
Why would I want to save designs in Labeley if I can simply download them to my computer? Good question! The reason many people prefer to keep their artwork in My Designs is because once they save their labels to the computer, the images are in PNG format which cannot be modified without an appropriate software for image editing. But if you save your labels in Labeley, you can simply click on the Edit Label icon that appears underneath the label in My Designs (as shown in the image) and you can modify the label as much as you want.
So, take a pick. Register with Labeley or stay anonymous. Whatever you choose, you’ll still be able to create as many labels as you want, all for free.
This has been a long tutorial and you might be eager to start designing. More tips and tricks for using Labeley are coming your way very soon. Stay tuned!